
It has been a week since the remake of The Legend of Zelda: Link's Awakening gotreleased for Nintendo Switch and during this time I've tried to play as much as possible. Of course the blogging here takes a lot of time, but it still speaks for the remake that it could entertain as long, considering that I would only need about one evening to complete the GameBoy (Color) version.
But the remake has a little bit more to do, mainly thanks to the Chamber Dungeon and the expanded mini-games. At first I've returned to the latter, because I wasn't completely done with the fishing and I couldn't even complete the Trendy Game before defeating the final boss...

It's nice that the game now saves after the credits and gives you a star on the save file, but the post game feels very pointless. At least the post game in The Minish Cap had a clear purpose: you would then get the figurines of the final boss and more. Here it would have made sense, if they had added some of the Wind Fish's Egg chambers to the Chamber Dungeon, but they didn't. All the post game does is letting you obtain the BowWow figurine... (And it shows the totals for Pieces of Hearts and Secret Seashells now in the Memories menu, similar to Breath of the Wild.)
Completing the Trendy Game also gives you a Chamber Stone with the +Monster Effect, which is really awesome, while the owner now also calls you "champ" and lets you play for only five Rupees. Not that playing at this point would have any value... But it's kind of weird, how it locks all of this behind defeating the final boss.

As for the fishing, I was still missing the Blooper and that one was a pain to get. Easily the hardest of the five different fish. To be honest, I still don't get the thing. From what it seems you have to reel in fast when it dives down and let go when it dives up... This worked for me, but it was still vibrating madly most of the time, where it constantly felt like I was doing it wrong. But even when I let the Blooper go, it would keep vibrating badly... Very weird.
The funny thing is that this scored me the heavyweight lure. It's like the game had it backward and expects you to catch the Blooper before the Ol' Baron. But for me the Ol' Baron was much, much easier to catch than that annoying Blooper. And getting the heavyweight lure now is completely pointless, because I've caught the big blue fish. You can catch every fish with every lure anyway, they only seem to affect how fast it sinks.
So, the final part of the game was clearing all additional challenges from Dampé. They are "golden", because you get a gold Rupee worth 300 from each of them. That's the only reward you'll get here, but at least this pays for the remaining Chamber Stones in the shop.
The challenges were quite creative with different restrictions and shapes. I really like the different forms here, where you have dungeons that look like a sword, a shield and a bow. They even had thematically fitting restrictions, where the "Crafting a Shield" challenge only gives you five hearts and the "Bows > Swords" challenge doesn't let you use your sword.
With the latter I tried actually using some rooms, where you have to use your Bow. Most times it's "Boomerangs > Bows" in this game, but there are exceptions, like the one room from Level 8, where you have to shoot an Eyegore statue with your bow. Or the Gohmas. Without the sword you actually have to use your Bow, because no other weapon seems to damage them.
Anyway, I also liked the "House of the Hinox" challenge quite a bit. It uses all three variations of the Hinox in a circle and restricts you to three minutes. Of course I only made a 3x3 dungeon here, but even small challenges like this can be fun. In fact I prefer doing some smaller challenges over the large, lengthy ones, where the additional challenges had plenty.
The "Back to Square One" challenge was interesting, because it makes somewhat clear why you can't connect the tunnels yourself. If you could, challenges like this would be way too easy, because you could simply connect the entrance with the black hole and Blaino chambers, which might potentially send you back. Of course you can still make this challenge quite easy by using as few chambers as possible, enough that the tunnels connect the right way from a big distance.
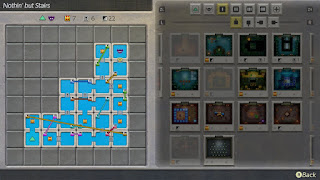
Apropos tunnels, a lot of people seem to have problems with the "Nothin' but Stairs" challenge, but I had this figured out within few minutes. Maybe I was just very lucky, but here is my solution:
And this turned out to be one of the most interesting Chamber Dungeons to play, because you had to figure out how all the tunnels connect. It had a randomizer feel to it, where it certainly would be fun to play dungeons that the game has randomly created for you.
The "Skull Arrangement" dungeon then basically led to the boss rush that I kept talking about. At least it had a total of eight fixed boss rooms in there and invited you to add the rest, which I did. I think the main reason, why they didn't force all bosses on you, is that you're getting certain boss chambers from Chamber Stones, so you're not guaranteed to have all these rooms yet. Of course a better solution would have been to not lock these chambers that way. Or simply add them as fixed chambers to the challenge, whether the player has them or not...
But I love how this dungeon mimics the classic Death Mountain dungeon from the first The Legend of Zelda game. Dampé even says that this shape feels familiar...

The last challenge is called "Supreme Shape" and looks like the letter Z. There was also a "Z" dungeon in the classic 2nd Quest, though this one here is certainly bigger. After the boss Infestation from the previous challenge, I decided to go mainly with puzzle rooms for that one as a nice and relaxing final challenge. (Or you can do just something like this.)
With all the money I could finally effort the last two Chamber Stones from the shop. There are seven in total, which accumulates to 8960 Rupees... Wow, and people thought the Bow was expensive. Well, these last two Chamber Stones gave me alternative chambers for Blaino and Hot Head.
I've tried to compile a list of all Chamber Stones with their locations and the chambers they give you:
14 in total seems like a weird amount, but I've checked with GameFAQs that this is indeed the final amount, even though there are rumors of a 15th one. However, as you can see in the list, you only get Chamber Stones from the island's main attractions like the shop and the mini-games. They aren't found in the wild, though I personally would have replaced the three Secret Medicine chests with Chamber Stones from the shop to add some of them to dungeons as well.
I've also played around with the Plus Effects somewhat and my favorite is certainly the "+Monsters Effect", which I got from the Trendy Game earlier. It's icon is very misleading, because when I first saw the effect, I thought it would make it rain Buzz Blobs. What it actually does is increasing the number of existing enemies in a room, often doubling it:

So, the Buzz Blob icon is kind of misleading, because there are no Buzz Blobs in dungeons... But the effect is a lot of fun. It often feels like that is what the number of monsters should have been in the first place. Of course the game stayed very faithful to the original, so the enemy placements are largely the same, which is a good thing.
But the original was very limited by the GameBoy's power. Try experiencing more than four enemies at the same time on the GameBoy, if you thought the frame drops in the remake were bad... But the Switch version certainly allows for many more enemies at the same time and it really feels good to blow through them all. Hero Mode should have made use of this mechanic for the entire game!
As for the other plus effects, the "+Shadow Link Effect" sadly isn't much fun, because the fights aren't as dynamic as they used to be in the Nintendo 3DS Zelda games. There you could damage the Shadow Link with your items as well, but this doesn't work here. Only the sword works, where you often have to wait for the Shadow Link to do a Spin Attack, which leaves him vulnerable for a split second. He also hits like a truck, but this may be because he mirrors my equipment, where I'm now getting hit by the power of the Red Mail and Koholint Sword combined.
The "+Wallmaster Effect" works similar to the Shadow Link, but with the difference that the Wallmaster keeps respawning after you've defeated it. Which is quite annoying, but at least it doesn't follow you into boss chambers...
The "+Rupees Effect" can yield quite different results, similar to the extra chests in dungeons. Sometimes I'm getting a good amount, other times it's most green and blue Rupees... But overall it doesn't hurt to place it somewhere into your dungeon. You can only use it once per arrangement, though, like the "+Hearts Effect", which is probably the most uninteresting effect (I wonder, if it works in Hero Mode, though).
The "+Bombs Effect" is fun to use on certain mini-bosses, mainly the Dodongo Snakes. They might swallow some of the fallen bombs, which saves you some time. It also helps with the Golem or the Hinox.
Anyway, after getting all the things, here is a shot of my inventory at the end of the game:
After clearing all 24 challenges it was time to make my own. Time to build the ultimate dungeon, where I wanted to create something under the following conditions:
The last requirement is what made this tricky and really turned this into an actual dungeon puzzle, even more so than the tougher challenges. But sadly this wasn't entirely possible, because not all dungeons have (enough) stairs available. So, I had to take some liberties, where there is one big section, which combines the Key Cavern, the Color Dungeon and the special amiibo chambers into one (this is also where I put the Shadow Link), as well as a combined section for Levels 4 and 5, because Level 4 simply doesn't have many chambers to offer.
So, this is what I came up with in the end. Behold, the Labyrinth of Tourian:


I also couldn't include all unique boss chambers, where this is missing the one for the Chief Moblin and the Dodongo Snakes chamber from the Turtle Rock dungeon. But the Dodongo Snakes from Level 6 are in there and the Turtle Rock area has all of its other mini-bosses, including a Blaino, who defends the Nightmare Key, if you get all chests in order. There is also a Wallmaster right before him, which certainly was a dumb idea. One mistake with these guys and you will get right back to the start of the dungeon. Funnily, Blaino's chamber lies right next to the entrance, so you would only get thrown off by one square, but it's a loooong way back to him.
This is a creation I would even share online, if the game had the option. But I will certainly save it to my new Link amiibo, while the solution to the "Nothin' but Stairs" challenge goes onto my 8-Bit Link amiibo.
Another complaint would be the music. While I don't dislike the Chamber Dungeon track, it gets somewhat repetitive after playing a dozen of dungeons with it. Ideally, you could select the music track for your Chamber Dungeon, where I probably would often choose the Color Dungeon music, because this would fit the whole thing more nicely.
But overall this seems to be a fun addition, which is perfect for whenever I want to play a little bit of Zelda. You know, when I want some dungeon action, but don't have the time to replay an entire Zelda game, even such a short game as Link's Awakening. Previously I would use the multiplayer Zelda games for that, but there you have to control multiple Links in singleplayer and you're always restricted to one item. And of course after some time you know the levels in and out and it gets boring as well.
This will be perfect for this. Of course I also know the dungeons of Link's Awakening in and out, but that has never stopped me from replaying the game or enjoying its contents. So, mixing together the dungeon rooms to play whatever I want at any time is sensational. If I could show this to myself 22 years ago, my past self probably would freak out in excitement and then spend twice his age of time in eager anticipation for this remake. What a great time to be a Zelda fan!
So, this is it, I have 100% completed the remake of Link's Awakening, at least in Normal Mode. Some ideas for improvements and maybe a thorough review will follow soon. I will also start playing Hero Mode next, where I will continue the Dream Diary – but with pure focus on the Hero Mode changes and replaying the game, since the 11 posts so far should cover most of the remake's changes extensively.
But the remake has a little bit more to do, mainly thanks to the Chamber Dungeon and the expanded mini-games. At first I've returned to the latter, because I wasn't completely done with the fishing and I couldn't even complete the Trendy Game before defeating the final boss...

It's nice that the game now saves after the credits and gives you a star on the save file, but the post game feels very pointless. At least the post game in The Minish Cap had a clear purpose: you would then get the figurines of the final boss and more. Here it would have made sense, if they had added some of the Wind Fish's Egg chambers to the Chamber Dungeon, but they didn't. All the post game does is letting you obtain the BowWow figurine... (And it shows the totals for Pieces of Hearts and Secret Seashells now in the Memories menu, similar to Breath of the Wild.)
Completing the Trendy Game also gives you a Chamber Stone with the +Monster Effect, which is really awesome, while the owner now also calls you "champ" and lets you play for only five Rupees. Not that playing at this point would have any value... But it's kind of weird, how it locks all of this behind defeating the final boss.

As for the fishing, I was still missing the Blooper and that one was a pain to get. Easily the hardest of the five different fish. To be honest, I still don't get the thing. From what it seems you have to reel in fast when it dives down and let go when it dives up... This worked for me, but it was still vibrating madly most of the time, where it constantly felt like I was doing it wrong. But even when I let the Blooper go, it would keep vibrating badly... Very weird.
The funny thing is that this scored me the heavyweight lure. It's like the game had it backward and expects you to catch the Blooper before the Ol' Baron. But for me the Ol' Baron was much, much easier to catch than that annoying Blooper. And getting the heavyweight lure now is completely pointless, because I've caught the big blue fish. You can catch every fish with every lure anyway, they only seem to affect how fast it sinks.
The Golden Challenges
So, the final part of the game was clearing all additional challenges from Dampé. They are "golden", because you get a gold Rupee worth 300 from each of them. That's the only reward you'll get here, but at least this pays for the remaining Chamber Stones in the shop.
The challenges were quite creative with different restrictions and shapes. I really like the different forms here, where you have dungeons that look like a sword, a shield and a bow. They even had thematically fitting restrictions, where the "Crafting a Shield" challenge only gives you five hearts and the "Bows > Swords" challenge doesn't let you use your sword.
With the latter I tried actually using some rooms, where you have to use your Bow. Most times it's "Boomerangs > Bows" in this game, but there are exceptions, like the one room from Level 8, where you have to shoot an Eyegore statue with your bow. Or the Gohmas. Without the sword you actually have to use your Bow, because no other weapon seems to damage them.
Anyway, I also liked the "House of the Hinox" challenge quite a bit. It uses all three variations of the Hinox in a circle and restricts you to three minutes. Of course I only made a 3x3 dungeon here, but even small challenges like this can be fun. In fact I prefer doing some smaller challenges over the large, lengthy ones, where the additional challenges had plenty.
The "Back to Square One" challenge was interesting, because it makes somewhat clear why you can't connect the tunnels yourself. If you could, challenges like this would be way too easy, because you could simply connect the entrance with the black hole and Blaino chambers, which might potentially send you back. Of course you can still make this challenge quite easy by using as few chambers as possible, enough that the tunnels connect the right way from a big distance.
Apropos tunnels, a lot of people seem to have problems with the "Nothin' but Stairs" challenge, but I had this figured out within few minutes. Maybe I was just very lucky, but here is my solution:

And this turned out to be one of the most interesting Chamber Dungeons to play, because you had to figure out how all the tunnels connect. It had a randomizer feel to it, where it certainly would be fun to play dungeons that the game has randomly created for you.
The "Skull Arrangement" dungeon then basically led to the boss rush that I kept talking about. At least it had a total of eight fixed boss rooms in there and invited you to add the rest, which I did. I think the main reason, why they didn't force all bosses on you, is that you're getting certain boss chambers from Chamber Stones, so you're not guaranteed to have all these rooms yet. Of course a better solution would have been to not lock these chambers that way. Or simply add them as fixed chambers to the challenge, whether the player has them or not...
But I love how this dungeon mimics the classic Death Mountain dungeon from the first The Legend of Zelda game. Dampé even says that this shape feels familiar...

The last challenge is called "Supreme Shape" and looks like the letter Z. There was also a "Z" dungeon in the classic 2nd Quest, though this one here is certainly bigger. After the boss Infestation from the previous challenge, I decided to go mainly with puzzle rooms for that one as a nice and relaxing final challenge. (Or you can do just something like this.)
Chamber Stones and Plus Effects
With all the money I could finally effort the last two Chamber Stones from the shop. There are seven in total, which accumulates to 8960 Rupees... Wow, and people thought the Bow was expensive. Well, these last two Chamber Stones gave me alternative chambers for Blaino and Hot Head.
I've tried to compile a list of all Chamber Stones with their locations and the chambers they give you:
14 in total seems like a weird amount, but I've checked with GameFAQs that this is indeed the final amount, even though there are rumors of a 15th one. However, as you can see in the list, you only get Chamber Stones from the island's main attractions like the shop and the mini-games. They aren't found in the wild, though I personally would have replaced the three Secret Medicine chests with Chamber Stones from the shop to add some of them to dungeons as well.
I've also played around with the Plus Effects somewhat and my favorite is certainly the "+Monsters Effect", which I got from the Trendy Game earlier. It's icon is very misleading, because when I first saw the effect, I thought it would make it rain Buzz Blobs. What it actually does is increasing the number of existing enemies in a room, often doubling it:

So, the Buzz Blob icon is kind of misleading, because there are no Buzz Blobs in dungeons... But the effect is a lot of fun. It often feels like that is what the number of monsters should have been in the first place. Of course the game stayed very faithful to the original, so the enemy placements are largely the same, which is a good thing.
But the original was very limited by the GameBoy's power. Try experiencing more than four enemies at the same time on the GameBoy, if you thought the frame drops in the remake were bad... But the Switch version certainly allows for many more enemies at the same time and it really feels good to blow through them all. Hero Mode should have made use of this mechanic for the entire game!
As for the other plus effects, the "+Shadow Link Effect" sadly isn't much fun, because the fights aren't as dynamic as they used to be in the Nintendo 3DS Zelda games. There you could damage the Shadow Link with your items as well, but this doesn't work here. Only the sword works, where you often have to wait for the Shadow Link to do a Spin Attack, which leaves him vulnerable for a split second. He also hits like a truck, but this may be because he mirrors my equipment, where I'm now getting hit by the power of the Red Mail and Koholint Sword combined.
The "+Wallmaster Effect" works similar to the Shadow Link, but with the difference that the Wallmaster keeps respawning after you've defeated it. Which is quite annoying, but at least it doesn't follow you into boss chambers...
The "+Rupees Effect" can yield quite different results, similar to the extra chests in dungeons. Sometimes I'm getting a good amount, other times it's most green and blue Rupees... But overall it doesn't hurt to place it somewhere into your dungeon. You can only use it once per arrangement, though, like the "+Hearts Effect", which is probably the most uninteresting effect (I wonder, if it works in Hero Mode, though).
The "+Bombs Effect" is fun to use on certain mini-bosses, mainly the Dodongo Snakes. They might swallow some of the fallen bombs, which saves you some time. It also helps with the Golem or the Hinox.
Anyway, after getting all the things, here is a shot of my inventory at the end of the game:
The Labyrinth of Tourian
After clearing all 24 challenges it was time to make my own. Time to build the ultimate dungeon, where I wanted to create something under the following conditions:
- Use all 64 squares.
- Use all chambers with bosses and mini-bosses, as well as one chamber with Shadow Link.
- Use the +Monsters Effect, where applicable.
- Divide the dungeon into small, separate sections, where each section represents a single dungeon of the game. The first section would be based on the Tail Cave with the chambers for the Rolling Bones and Moldorm boss fights present and the next the Bottle Grotto with its Hinox and Genie fights. You go from one section to the next via tunnels.
The last requirement is what made this tricky and really turned this into an actual dungeon puzzle, even more so than the tougher challenges. But sadly this wasn't entirely possible, because not all dungeons have (enough) stairs available. So, I had to take some liberties, where there is one big section, which combines the Key Cavern, the Color Dungeon and the special amiibo chambers into one (this is also where I put the Shadow Link), as well as a combined section for Levels 4 and 5, because Level 4 simply doesn't have many chambers to offer.
So, this is what I came up with in the end. Behold, the Labyrinth of Tourian:


I also couldn't include all unique boss chambers, where this is missing the one for the Chief Moblin and the Dodongo Snakes chamber from the Turtle Rock dungeon. But the Dodongo Snakes from Level 6 are in there and the Turtle Rock area has all of its other mini-bosses, including a Blaino, who defends the Nightmare Key, if you get all chests in order. There is also a Wallmaster right before him, which certainly was a dumb idea. One mistake with these guys and you will get right back to the start of the dungeon. Funnily, Blaino's chamber lies right next to the entrance, so you would only get thrown off by one square, but it's a loooong way back to him.
This is a creation I would even share online, if the game had the option. But I will certainly save it to my new Link amiibo, while the solution to the "Nothin' but Stairs" challenge goes onto my 8-Bit Link amiibo.
Another complaint would be the music. While I don't dislike the Chamber Dungeon track, it gets somewhat repetitive after playing a dozen of dungeons with it. Ideally, you could select the music track for your Chamber Dungeon, where I probably would often choose the Color Dungeon music, because this would fit the whole thing more nicely.
But overall this seems to be a fun addition, which is perfect for whenever I want to play a little bit of Zelda. You know, when I want some dungeon action, but don't have the time to replay an entire Zelda game, even such a short game as Link's Awakening. Previously I would use the multiplayer Zelda games for that, but there you have to control multiple Links in singleplayer and you're always restricted to one item. And of course after some time you know the levels in and out and it gets boring as well.
This will be perfect for this. Of course I also know the dungeons of Link's Awakening in and out, but that has never stopped me from replaying the game or enjoying its contents. So, mixing together the dungeon rooms to play whatever I want at any time is sensational. If I could show this to myself 22 years ago, my past self probably would freak out in excitement and then spend twice his age of time in eager anticipation for this remake. What a great time to be a Zelda fan!
Final Status:
- Secret Seashells: 50 (24 old + 26 new)
- Pieces of Heart: 32 (12 old + 20 new)
- Chambers: 193
- Chamber Stones: 14
- Challenges Cleared: 24
So, this is it, I have 100% completed the remake of Link's Awakening, at least in Normal Mode. Some ideas for improvements and maybe a thorough review will follow soon. I will also start playing Hero Mode next, where I will continue the Dream Diary – but with pure focus on the Hero Mode changes and replaying the game, since the 11 posts so far should cover most of the remake's changes extensively.
No comments:
Post a Comment